Wsparcie produktowe
Uzyskaj pomoc dotyczącą posiadanych produktów
Nie wiesz, jak używać jednego z naszych produktów?
Nie masz pewności, jak je czyścić?
Znajdź wszystkie przydatne informacje właśnie tutaj.
Pierwsze kroki
Dziękujemy za zakup pojedynczego elektrycznego laktatora Tommee Tippee!
Ten elektryczny laktator, będący częścią naszej oferty Made for Me™, jest wyposażony w miękki, wygodny róg masujący, który pomaga uzyskać więcej pokarmu w krótszym czasie. Jest zasilany przez lekki, przenośny zasilacz, dzięki czemu możesz go używać, gdziekolwiek potrzebujesz.
Na tej stronie znajdziesz odpowiedzi na wszelkie pytania, które pomogą Ci w pełni wykorzystać możliwości laktatora. Czytaj dalej, aby uzyskać wsparcie dotyczące produktu i porady dotyczące rozwiązywania problemów.
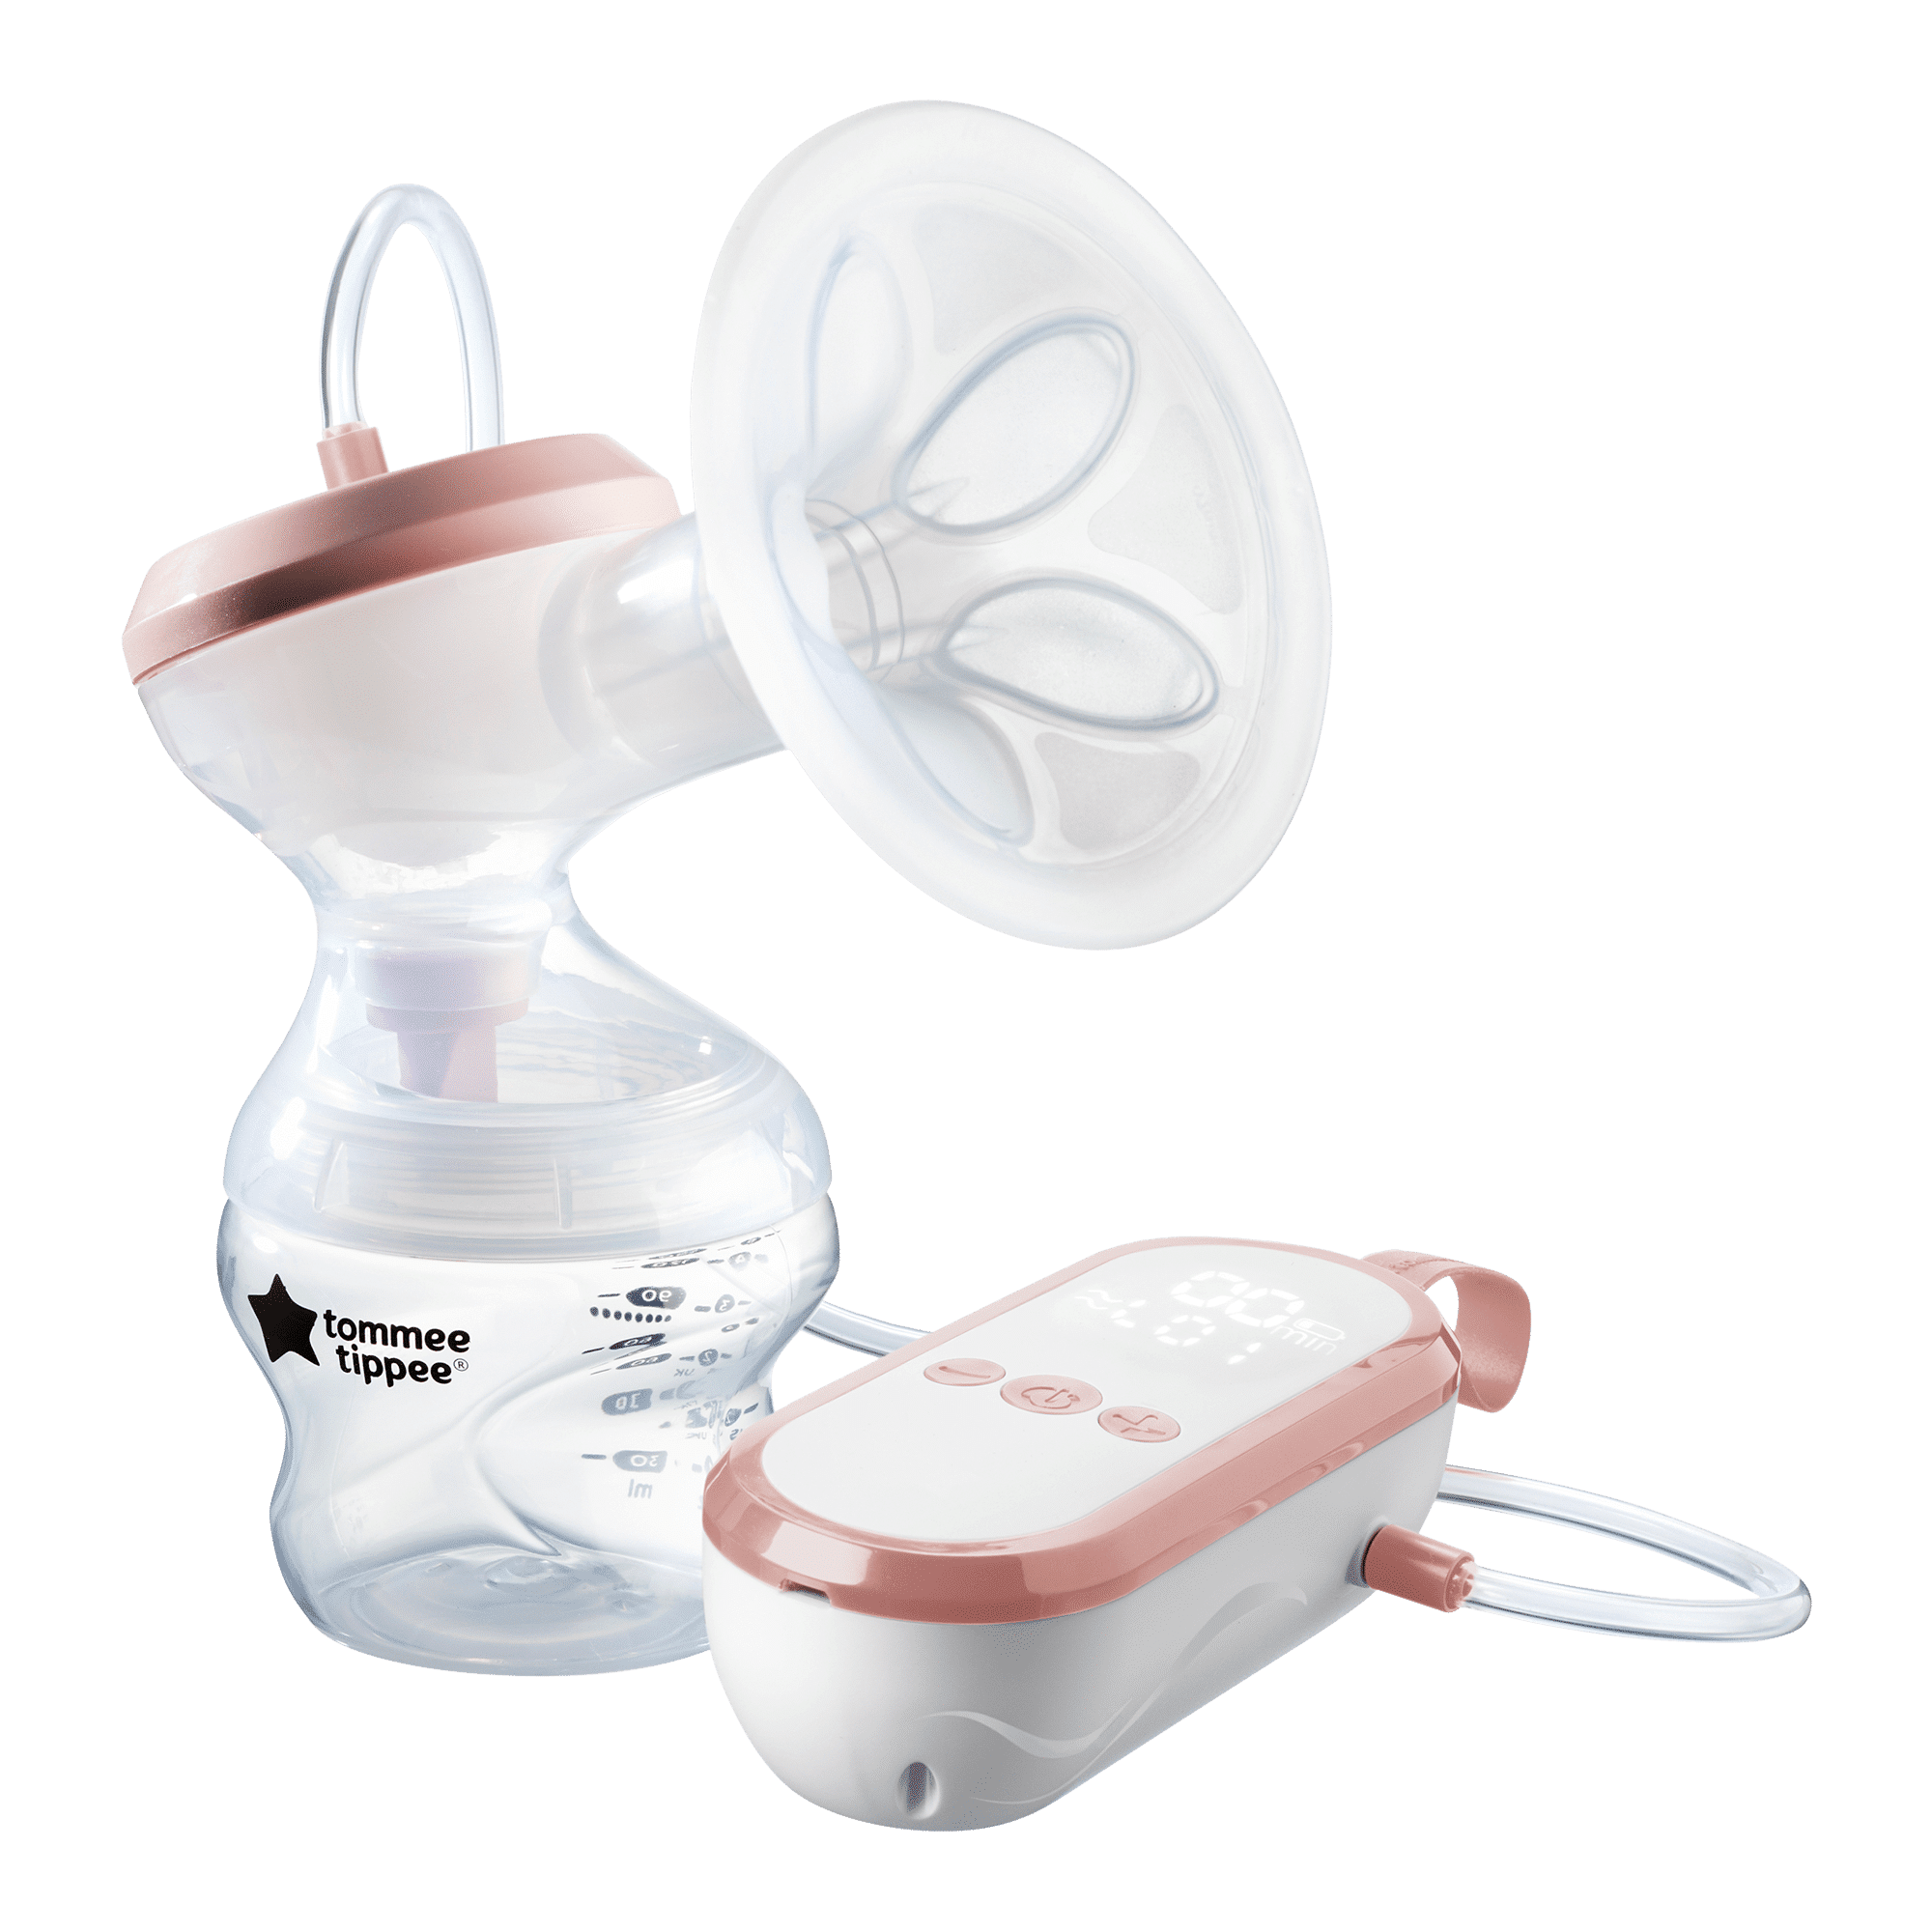
Przewodnik po częściach
Razem te części tworzą słuchawkę laktatora i można je myć…
Róg – część w kształcie trąbki z miękką krawędzią, która wygodnie przylega do piersi i płatkami do masażu, aby stymulować większy wypływ mleka.
Korpus – część w kształcie kaczki, którą trzymasz i łączy róg i kubek z butelką.
Zawór kaczy dziób (brzoskwiniowy) – mały zawór jednokierunkowy, który wpuszcza mleko z piersi do butelki, ale nie przepuszcza go z powrotem podczas ruchu.
Membrana – mała, przezroczysta część w kształcie miseczki, która oddziela „mokrą” stronę laktatora od „suchej” strony. Dzięki temu jest to zamknięty system pomp.
Nasadka membrany – uszczelki przylegające do membrany.
Pokrywka (brzoskwiniowa) – umożliwia podłączenie przewodu powietrza do pompki i zamknięcie słuchawki pompki.
Do słuchawek pompy podłączane są następujące części. Tych części nie można myć…
Rurki powietrzne – dwie plastikowe rurki zakończone brzoskwiniowymi złączami na każdym końcu, które łączą laktator z zasilaczem
Jednostka napędowa – mały, przenośny silnik, który napędza funkcje masażu i odciągania pokarmu Twojego laktatora.
Przycisk zasilania/trybu – służy do włączania i wyłączania pompy oraz przełączania pomiędzy trybem masażu i odciągania/pompowania.
Zwiększ moc ssania.
Zmniejsz moc ssania.
Wyświetlacz LED – pokazuje tryb, czas i poziom naładowania.
Złącze przewodu powietrza – tutaj można podłączyć przewód powietrza do zasilacza.
Gniazdo USB – podłącz je do źródła zasilania USB (o natężeniu 2 A lub niższym), aby naładować.
Pętla do noszenia – ułatwia poruszanie się podczas korzystania z pompy.
Jak czyścić pojedynczy laktator elektryczny
Oddziel każdą część każdej słuchawki pompy i umyj ją w czystej wodzie z mydłem. Nie używaj wody używanej do czyszczenia innych produktów.
Dokładnie spłucz czystą wodą.
Części słuchawki pompy można także myć w górnym koszu zmywarki. Aby zapewnić bezpieczeństwo, umieść brzoskwiniowy zawór z kaczym dziobem w koszu na sztućce lub w koszu zmywarki.
Wysterylizować wszystkie części obu końcówek pompy, stosując sterylizację zimną wodą, sterylizację mikrofalową, wrzącą wodą lub elektryczną sterylizację parową.
DO
Przed dotknięciem laktatora umyj ręce wodą z mydłem i dokładnie osusz.
Dokładnie wyczyść i wysterylizuj wszystkie części laktatora, które mają kontakt z mlekiem, postępując zgodnie z poniższymi instrukcjami. Należy to zrobić przed pierwszym użyciem i po każdym użyciu.
NIE
Umyj lub wysterylizuj przewody powietrzne. Może to spowodować gromadzenie się bakterii w rurkach i uszkodzenie jednostki napędowej.
Umyj, wysterylizuj lub podgrzej jednostkę napędową. Jest to niebezpieczne i może spowodować uszkodzenie jednostki napędowej.
Montaż pojedynczego laktatora elektrycznego
Za każdym razem, gdy używasz laktatora, sprawdź wszystkie części laktatora i zasilacz pod kątem uszkodzeń.
Przed dotknięciem laktatora umyj ręce wodą z mydłem i dokładnie osusz.
Upewnij się, że wszystkie części pompy zostały umyte, oczyszczone i wysterylizowane oraz że są całkowicie suche.
Umieść przezroczystą membranę w górnej części korpusu i delikatnie dociśnij, aby uzyskać dobre uszczelnienie.
Nałożyć przezroczystą nasadkę z błoną na membranę i delikatnie wcisnąć, aby uszczelnić.
Umieść brzoskwiniową pokrywkę na górze korpusu i obróć ją w kierunku zgodnym z ruchem wskazówek zegara, aż do zatrzaśnięcia.
Dociśnij klakson do korpusu, aż zostanie zatrzaśnięty i zabezpieczony. Odwróć słuchawkę pompy do góry nogami.
Włóż brzoskwiniowy zawór z kaczym dziobem. Delikatnie ściśnij boki zaworu, aby upewnić się, że jest otwarty.
Wkręć butelkę Tommee Tippee Closer to Nature lub Advanced Anti-Colic. Ten laktator został zaprojektowany tak, aby pasował do wszystkich butelek Tommee Tippee Closer to Nature i Advanced Anti-Colic (z wyjątkiem szklanych butelek Tommee Tippee Closer to Nature) oraz torebek na mleko Express & Go / Pump & Go z pierścieniami adaptera.
Umieścić zmontowaną pompę na płaskiej powierzchni. Podłącz jeden koniec przewodu powietrznego do brzoskwiniowej pokrywy korpusu pompy, a drugi do jednostki napędowej. Wchodzi w otwór z boku.
Ładowanie pojedynczego laktatora elektrycznego
Zasilacz laktatora wykorzystuje baterię podobną do tej w telefonie komórkowym. Naładuj go, aby móc zasilać laktator w dowolnym miejscu.
Aby korzystać z laktatora, nie musisz podłączać zasilacza do źródła zasilania.
Zasilacz będzie dostarczany z pewnym naładowaniem, ale przed pierwszym użyciem należy go w pełni naładować.
Aby naładować jednostkę napędową…
Podłącz jeden koniec kabla USB do zasilacza, a drugi koniec do dostarczonego adaptera.
Ikona baterii LED zacznie migać, wskazując, że zasilacz się ładuje. Ładuj, aż wszystkie 3 paski będą pełne. Czas ładowania może się różnić w zależności od napięcia i używanego sprzętu i wynosi od 3 do 6 godzin.
Po całkowitym naładowaniu wszystkie trzy diody LED pozostaną włączone